Saturday, 4 July 2015

Tomcat 8 on Debian Jessie with PSI Probe and OpenNMS to monitor performance (Part 3)

We looked at Tomcat 8 in Part 1 of this series and at PSI Probe as a replacement for the default Tomcat Manager application in Part 2.

Now PSI Probe is great for managing Tomcat and its applications, but it does not actively generate alerts if Tomcat is in difficulty, or any other part of the application stack for that matter, so this is where OpenNMS plugs the gap.

Network Management with OpenNMS

If you cut your teeth on the mainframes of the recent past, you will be familiar with network management tools like HP OpenView and IBM Tivoli. These tools are famous for their complexity and cost, so alternatives like Nagios (subsequently forked as Icinga) and OpenNMS emerged as open source alternatives.

OpenNMS is a Java-based, agentless monitoring tool that uses SNMP to monitor devices on the network. It was designed to manage service level agreements, so in addition to fault reporting (with trouble ticketing), it has a large number of service monitors to report against service thresholds.

If your device is SNMP-enabled, OpenNMS will auto-discover the device, add it as another node to your network topology and start monitoring it immediately, including vending machines.


OpenNMS Installation

The instructions for installing on Debian are here, but I will deviate slightly because I want to install OpenNMS on a pre-existing installation of Postgresql 9.4 on another server.

Create a database for OpenNMS

Login to the database server (called 'my-database-ip' here) and create an empty database called 'opennms', owned by 'opennms':
# su - postgres
# psql -c "CREATE USER opennms WITH LOGIN ENCRYPTED PASSWORD 'my-opennms-password';"
# psql -c "CREATE DATABASE opennms WITH OWNER=opennms ENCODING 'UNICODE';"

Install OpenNMS

On the server that you intend to run OpenNMS (called 'my-server-ip' here), add the OpenNMS repository to the APT sources list, add GPG key to verify the integrity of the package, update APT and install OpenNMS:
# vi /etc/apt/sources.list.d/opennms.list
   deb http://debian.opennms.org stable main
# wget -O - http://debian.opennms.org/OPENNMS-GPG-KEY | apt-key add -
# apt-get update
# apt-get install opennms
Once the installation is complete, the database must be initialised, but before you run the scripts, you must give OpenNMS access to the database that you created by configuring the datasources:
# vi /etc/opennms/opennms-datasources.xml
  <jdbc-data-source class-name="org.postgresql.Driver" database-name="opennms" name="opennms" password="my-opennms-password" url="jdbc:postgresql://my-database-ip:5432/opennms" user-name="opennms">
  <jdbc-data-source class-name="org.postgresql.Driver" database-name="template1" name="opennms-admin" password="my-postgres-password" url="jdbc:postgresql://my-database-ip:5432/template1" user-name="postgres">
Now configure the JRE for OpenNMS and then run the installation:
# /usr/share/opennms/bin/runjava -s
# /usr/share/opennms/bin/install -dis
Install the iplike package to optimize lookups based on IP addresses, and then start the service:
# /usr/sbin/install_iplike.sh
# systemctl start opennms
If all is well, you should be able to browse to your instance of OpenNMS at http://my-server-ip:8980 and log in with admin/admin.

You can check that all the daemons are running with:
# opennms -v status
Note that OpenNMS uses two ports that you should be aware of: an httpAdaptor at 8181 and the application itself running on Jetty at 8980.

Once you have completed the install, you may want to comment out the OpenNMS repository that you added to APT, to prevent unsolicited updates of OpenNMS, particularly in a Production environment.

Discover nodes

By default OpenNMS monitors no network nodes at all, so the very first thing to do is to register the nodes to be monitored.

You can do a range scan but that will register every device in the range, whether you want to manage it or not, so rather register the nodes explicitly.

There are a number of ways to do this, but since you already have the IP address, the easiest is to register it directly:

Admin > Configure OpenNMS > Configure Discovery > Specifics > Add new

This will open a pop-up where you enter the IP address of the node, in this case it would be my-server-ip.

Click on 'Add", then when the pop-up closes, click on 'Save and Restart Discovery'.

Wait a moment while the discovery daemon runs, then list the node that you registered:

Info > Nodes

Now that the node has been discovered, I will show you how to monitor the JVM using JMX and SNMP in a later post. In the meantime, play around with the Service Level Management functionality in OpenNMS that comes out of the box.

Wednesday, 1 July 2015

Tomcat 8 on Debian Jessie with PSI Probe and OpenNMS to monitor performance (Part 2)

In Part 1 of this series of three, I looked at the installation of Tomcat 8 on Debian Jessie. The standard Tomcat Manager web application is limited in functionality, and the look-and-feel is distinctly lacking, so here is PSI Probe instead.

PSI Probe features

PSI Probe supplements the basic functionality of Tomcat Manager with a number of very useful features, including:
  • real-time monitoring of request traffic on the Connectors, from any Remote IP, or per application;
  • viewing of Data Source pool usage, and query execution;
  • monitoring of Logs, with the ability to dynamically change log levels at runtime;
  • viewing the Thread execution stack, with the option of killing threads;
  • dashboards to monitor the JVM, showing memory usage, swap file usage and garbage collection control;
  • and detailed System properties data.
PSI Probe is a fork of an older application called Lambda Probe that was last updated in 2006. This is a Lambda Probe:


Installing PSI Probe

You have to build PSI Probe from the source code because it is not available as a Debian package. It is a Java application, so it is a simple matter of cloning the project from GitHub and running Maven:
# git clone https://github.com/psi-probe/psi-probe
Check that you are using Maven 3, and upgrade if necessary, because the build will fail if you use Maven 2. Don't forget to purge maven2 if you have to upgrade.
# mvn -version
Apache Maven 3.0.5
Maven home: /usr/share/maven
Java version: 1.7.0_79, vendor: Oracle Corporation
Java home: /usr/lib/jvm/java-7-openjdk-amd64/jre
Default locale: en_ZA, platform encoding: UTF-8
OS name: "linux", version: "3.16.0-4-amd64", arch: "amd64", family: "unix"
If all is well, change to the PSI Probe directory and build the WAR file:
# cd psi-probe
# mvn package
The build will take some time the first time that you run it, because of all the JARs that must be downloaded from Maven Central to your local repository.

When it is done, use the Tomcat manager to deploy the war. Browse to http://my-server-IP:8080/manager, login with the same manager-gui role that you created in Part 1, scroll down to the section titled "Deploy" and use the option "Select WAR file to upload" to deploy the WAR file which you will find at psi-probe/web/target/probe.war.

Once it is deployed, browse to http://my-server-IP:8080/probe, login with the same manager-gui role, and dig around your Tomcat 8 installation. Much better looking, isn't it?


In Part 3, the last of this series, I will explain how OpenNMS can be used with SNMP to monitor Tomcat 8 and generate exceptions if any thresholds are exceeded.

Tuesday, 30 June 2015

Tomcat 8 on Debian Jessie with PSI Probe and OpenNMS to monitor performance (Part 1)

This is the first of three posts about the latest version of Apache Tomcat, still the most widely used application server, on Debian Jessie, with PSI Probe to manage it and OpenNMS to monitor its up-time.

What's new in Tomcat 8?

Debian Jessie was released with Apache Tomcat 8, which provides the following:
  • Java Servlet 3.1, an incremental release of the servlet specification that includes non-blocking I/O to improve scaleability and an HTTP protocol upgrade mechanism that allows the client and the server to negotiate a transition from HTTP 1.1 to some other new chosen protocol;
  • JavaServer Pages 2.3, a maintenance release to provide support for Expression Language (EL) 3.0 and to use the functionality of the Servlet 3.1 API;
  • Java Unified Expression Language (EL) 3.0, which allows EL to run in a standalone mode outside of servlets or JSPs, plus lambda expressions and other Java 8 goodies;
  • WebSocket 1.1, which allows full duplex communications over TCP so that bidirectional data can flow at the same time;
  • A single, common resources implementation that merges Aliases, VirtualLoader, VirtualDirContext, JAR resources and external repositories into a single framework rather than a separate one for each feature;
  • and Java EE 7 as a minimum pre-requisite, preferably Java EE 8, which has better support for HTML5, WebSockets, JSON and RESTful services.


Tomcat 8 is more flexible and better equipped to support web services than its predecessor, so let's proceed to the upgrade.

Installing Tomcat 8

Installing Tomcat 8 on Debian Jessie is dead simple. First, SSH to your web server (called 'my-server-IP' here) as root, and  execute 'java -version' to check that OpenJDK 7 is installed as a minimum:

# java -version
java version "1.7.0_79"
OpenJDK Runtime Environment (IcedTea 2.5.5) (7u79-2.5.5-1~deb8u1)
OpenJDK 64-Bit Server VM (build 24.79-b02, mixed mode)

If you don't see OpenJDK 7, you will have to install it and set it to be the default JVM:

# apt-get install openjdk-7-jdk openjdk-7-demo openjdk-7-source
# update-alternatives --config java

If you prefer, you can install OpenJDK 8 from the jessie-backports repository instead of OpenJDK 7, but it makes no difference to Tomcat 8.

Now install Tomcat 8:

# apt-get install tomcat8 tomcat8-admin tomcat8-docs tomcat8-examples tomcat8-user 

If all goes well, the service should start automatically and you should be able to browse to http://my-server-IP:8080 to see the default page:

Configuring Tomcat 8

Once you have installed Tomcat 8, you must enable the manager webapp, and you may optionally tune the JVM memory settings.

Edit /etc/tomcat8/tomcat-users.xml to include a manager (called 'my-user' here), with the appropriate roles to use the web console manager:

# vi /etc/tomcat8/tomcat-users.xml
<tomcat-users>
   <role rolename="manager-gui"/>
   <role rolename="admin-gui"/>
   <user username="my-user" password="my-user-password" roles="manager-gui,admin-gui"/>
</tomcat-users>

The manager-gui role has the highest privileges, allowing you to use the web console manager to deploy and undeploy apps, view stats, generate leak detection diagnostics, expire sessions, and so on. The admin-gui role is needed to access the virtual host manager.

Optionally edit the default Tomcat 8 configuration to make sure that JAVA_HOME is correctly set and to tune the performance of the JVM:

# vi /etc/default/tomcat8
JAVA_HOME=/usr/lib/jvm/java-7-openjdk-amd64
JAVA_OPTS="-Djava.awt.headless=true -Xms2048m -Xmx2048m -XX:+UseConcMarkSweepGC"

Now restart Tomcat 8, using the systemd way of managing services:

# systemctl restart tomcat8

and browse to http://my-server-IP:8080/manager.

Login with the username you created in tomcat-users.xml to access the Web Application Manager, an eye-watering horror of mustard and green that we will quickly replace with PSI Probe in Part 2 of this series, a much better-looking web console manager with a raft of extra functionality.


Location of Tomcat 8 directories on Debian

Note that the Debian package maintainers have a standard Debian way of doing things so the Tomcat 8 directories may not be where you expect them to be. The relevant locations are:

/etc/default: the initial default settings such as the Tomcat user ID, JAVA_HOME, JVM settings, and so on, are in the file 'tomcat8'.

/etc/tomcat8: the server configuration files are here, including context.xml, server.xml and tomcat-users.xml.

/etc/logrotate.d: the log settings for catalina.out are in the file 'tomcat8'.

/usr/share/tomcat8: this is $CATALINA_HOME, the root of the Tomcat installation, also known as $TOMCAT_HOME. It has startup, shutdown, and other scripts, as well as the Tomcat JARs in $CATALINA_HOME/lib (the original project to develop the servlet engine was called Catalina).

/var/lib/tomcat8: this is $CATALINA_BASE, also known as $TOMCAT_BASE, which holds instance-specific directories for web applications, with the code in $CATALINA_BASE/webapps.

/var/log/tomcat8: all the log files are stored here.

Now stay tuned for the installation of PSI Probe in Part 2.

Friday, 3 April 2015

How to fix and run the broken EclipseLink Tutorial example (JSF and JPA)

The EclipseLink Tutorial

The EclipseLink implementation of JPA has a tutorial for running it with JSF on the Tomcat servlet container, instead of a full-blown Java EE Application Server.

The tutorial mentions two source code downloads, both of which were missing from the page, but I managed to find a directory of the stubbed tutorial source that you can use as a starting point as you follow the EclipseLink tutorial, as well as the code for the completed version of the application.

Unfortunately, the tutorial is out-of-date, the source code has several errors, and the application itself is very primitive, but you may be curious enough to want to try it out anyway. This is how to get the completed application running on Tomcat against a PostgreSQL database using the Eclipse IDE.

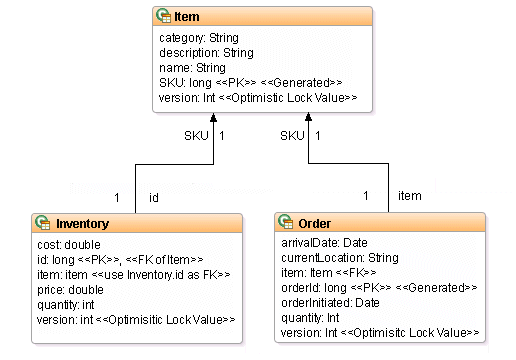
The application is a very simple Order application with this object model:

Tutorial Object Model


Set up the environment

Download and unzip the code for the completed version of the application. It is an Ant project that is not structured like an Eclipse Dynamic Web Project, so just create a simple Java project, called here EclipseLinkTutorial, and import the source code order-jsf-jpa-example-128127 from your download folder.

Tomcat is a servlet container, not a Java EE application server like WildFly (formerly known as JBoss Application Server), so you must manually copy the PostgreSQL database driver as well as the EclipseLink and Java Persistence JARs to EclipseLinkTutorial/lib. I got mine from my Maven repo because I had used them in another project. They are:
  • postgresql-9.3-1102-jdbc41.jar 
  • eclipselink-2.6.0-M3.jar 
  • javax.persistence-2.1.0.jar 
Don't forget to refresh the project so that Eclipse can see the jars. Note that it is not worth the bother to Mavenise the project to add these dependencies. See this StackOverflow discussion about Ant and Maven.

Configure the database

Switch to your database server, fire up psql as postgres and create a login role (a.k.a. the user) and database:

CREATE ROLE eclipselinktutorial LOGIN SUPERUSER CREATEDB;
ALTER ROLE eclipselinktutorial PASSWORD 'eclipse';
CREATE DATABASE eclipselinktutorial WITH ENCODING='UTF8' OWNER=eclipselinktutorial;

Test the connection from Eclipse, where 'your-DB-server' is either the hostname of your database server or 'localhost' if you have installed PostgreSQL on your workstation:

→ Window → Open perspective → Other... → Database development
Right-click Database Connections → New... → Connection
      Profile Types: PostgreSQL
      Name: eclipselinktutorial
→ Next
      Database: eclipselinktutorial
      URL: jdbc:postgresql://your-DB-server:5432/eclipselinktutorial
      User name: eclipselinktutorial
      Password: eclipse

Check the 'Save the password' box then click on Test Connection. It should say "Ping succeeded". Click on Finish.

Configure the JPA persistence properties

Edit the persistence file EclipseLinkExample\persistence-unit\src\META-INF\persistence.xml and set the following properties to match the database configuration (don't forget to change 'your-DB-server'):

<persistence xmlns="http://java.sun.com/xml/ns/persistence"
 xmlns:xsi="http://www.w3.org/2001/XMLSchema-instance"
 xsi:schemaLocation="http://java.sun.com/xml/ns/persistence persistence_1_0.xsd"
 version="1.0">
 <persistence-unit name="default" transaction-type="RESOURCE_LOCAL">
  <provider>org.eclipse.persistence.jpa.PersistenceProvider</provider>
  <class>oracle.toplink.jpa.example.inventory.model.Inventory</class>
  <class>oracle.toplink.jpa.example.inventory.model.Order</class>
  <class>oracle.toplink.jpa.example.inventory.model.Item</class>
  <properties>
   <property name="javax.persistence.jdbc.logging.level" value="FINE" />
   <property name="javax.persistence.jdbc.driver" value="org.postgresql.Driver" />
   <property name="javax.persistence.jdbc.url"
    value="jdbc:postgresql://your-DB-server:5432/eclipselinktutorial" />
   <property name="javax.persistence.jdbc.password" value="eclipse" />
   <property name="javax.persistence.jdbc.user" value="eclipselinktutorial" />
  </properties>
 </persistence-unit>
</persistence>

Fix the project

The downloaded source code directory from the Oracle site has errors that cause the Ant build.xml script to fail.

It is missing directories that the Ant build.xml script expects, so create the following folders:
  • persistence-unit/classes 
  • persistence-unit/deploy 
  • extras/classes 
  • web-application/classes 
  • web-application/deploy 
The entities in EclipseLinkTutorial/persistence-unit/src have a property called version which has an annotation of @Version. In the entity Item, the setVersion() method is annotated, not the field itself, which will cause this error:
      Mapping metadata cannot be applied to properties/methods
      that take arguments.

Annote the field version in the entity Item with @Version and remove the getter and setter to fix this.

The entity Item also has the annotations @Id and @GeneratedValue on the method getSKU(), not the field SKU itself. Move them to the correct place:
       @Id
       @GeneratedValue
       protected long SKU;

There are two named queries in Order that will generate build errors because 'SKU' is incorrectly written 'sKU'. Edit Order and make sure they both read 'SKU".

In the build.xml file, include this line to each of the three javac directives to suppress warnings when the Ant build runs:
      includeantruntime="false"

Lastly, edit the DDLGenerator class in extras/src to replace "toplink.ddl-generation" with "eclipselink.ddl-generation" so that when the generate-tables target is executed, the correct property is set to instruct the Entity Manager to recreate the tables.

Generate the database tables

Now you are ready to run the Ant builds:

Right-click EclipseLinkTutorial/build.xml → Run As → Ant Build...
      Deselect the default target to be executed and select generate-tables
→ Run

If it runs very quietly with no errors, you have succeeded. Yay.


Now create the data by executing the Ant target populate-data.

Generate the WAR

The last step is to compile and package the WAR for deployment to Tomcat:

Right-click EclipseLinkTutorial/build.xml → Run As → Ant Build...
      Select the default target all and check that the other targets are deselected
→ Run

It will create EclipseLinkTutorial/web-application/deploy/jpa-example.war which you can deploy to your instance of Tomcat.

Of course, getting the complete application up and running is one thing. Understanding JPA is another, so download the stubbed code, roll up your sleeves and work through the tutorial.

Thursday, 12 March 2015

Upgrade to Debian Jessie before the Official release date


I have been running Gnome Classic on Debian Wheezy for the last couple of years, but Debian Jessie will be released soon and it includes some interesting new packages:
  • Docker for Linux containers
  • Steam for gaming (in non-free) 
  • ownCloud for private cloud storage 
  • systemd as default, which caused a lot of angst in the Debian community
Unlike other distros, the Debian release policy is to release when it is good and ready. Jessie was frozen in November last year and the package maintainers are down to the last 55 Release Critical bugs, so Jessie is likely to be formally released in April this year.

None of my systems are mission-critical so I decided to do an in-place upgrade from Wheezy to Jessie now, before it is officially released.


It's all very straightforward if you follow the Debian instructions.

First, back up the data you care about to an external drive in the unlikely event that it all goes pear-shaped. You do backup regularly don't you? Good for you. I don't. Nobody does. Well, except for you and other more disciplined network administrators.

Second, make sure that your existing implementation of Wheezy is up-to-date and consistent.

# apt-get update
# apt-get upgrade

List any packages which have a status of Half-Installed or Failed-Config, or show an error status.

# dpkg --audit

List any packages which have been put on hold.

# dpkg --get-selections | grep 'hold$'

Fix them, then when you are done, list all your packages and check that they all show 'ii' in the first column.

# dpkg -l | more

Rinse and repeat. When you are done, remove any forgotten packages.

# apt-get autoremove

Now you are ready to update and upgrade. Replace Wheezy with the Jessie repositories by editing the software sources in /etc/apt/sources.list and changing "wheezy" or "stable" to "jessie".

# vi /etc/apt/sources.list
deb http://yourmirror.debian.org/debian/ jessie main
deb http://security.debian.org/ jessie/updates main
deb http://yourmirror.debian.org/debian/ jessie-updates main
deb http://yourmirror.debian.org/debian/ jessie-backports main

Update the list of available packages for the new release.

# apt-get update

The upgrade is a two-part process: first a minimal upgrade of those packages which can be upgraded without requiring other packages to be removed or installed, then the Full Monty, a complete upgrade of the system, installing the newest versions of all packages and resolving dependency changes between packages.

# apt-get upgrade
# apt-get dist-upgrade

You may get prompted to respond to questions from the install scripts. Most often the default answer is correct, but always choose the option to display the proposed changes before deciding.

Once it has run its course, you can remove the old Wheezy packages.

# apt-get autoremove

You can see a list of the new features in the new release here.