Sunday, 28 July 2019

NextCloud on RHEL 8

Cloud Storage under your control

If you too are wary of storing your personal or corporate data on a public cloud under conditions over which you have no control, and if you have your own hardware and technical skills, consider Nextcloud, a software suite written in PHP that you can run on your own private servers to provide similar functionality as DropBox, Google Docs or Microsoft OneDrive.

It is open source software, licensed under the GNU Affero General Public License which guarantees that you can use, study, share and improve the software without any legal risks, so there is no cost if you are prepared to support it yourself, though the Nextcloud OEM offers Enterprise Subscriptions if you need additional features and access to technical expertise and capabilities from them.

The generic installation instructions are here, but to make life easier, here is a more specific guide to install Nextcloud on Redhat Enterprise Linux 8 and PostgreSQL, running on Apache.

Prerequisites

Conveniently, RHEL 8 provides all the prerequisites with the recommended versions straight out of the box. Install as root, or run with sudo, the instructions that follow.

PHP 7.2

Install the following PHP modules:
# dnf install -y php php-gd php-mbstring php-intl php-json \
php-zip php-process php-xml php-bz2 php-fileinfo php-intl php-pgsql
List the PHP modules that have been installed to check that all PHP prerequisites have been met:
# php -m
Note that you may come across instructions that include php-imagick, but this is no longer recommended for security reasons (though you could still install it manually if this is a deal-breaker).

Apache HTTP 2.4

If you haven't already installed and enabled Apache, do so now:
# dnf install -y httpd
# systemctl enable httpd
# systemctl start httpd
Open port 80 on the firewall:
# firewall-cmd --zone=public --add-service=http --permanent
# firewall-cmd --reload
HTTP is OK for basic installation purposes, but you must get a SSL certificate and use HTTPS on port 443 to secure the service in production.

Check that the Apache server has loaded all the required PHP modules by creating a file called 'phpinfo.php' under the Apache base directory '/var/www/html/' with the following content:
<?php
     phpinfo ();
?>
Browse to 'http://<your-server>/phpinfo.php' and admire your progress so far. Don't forget to delete it immediately after congratulating yourself. No point in giving miscreants more information than they need to know.

PostgreSQL 10.6

Nextcloud recommends MySQL or MariaDB, but PostgreSQL has enterprise-strength features that the other two do not provide, so use it instead:
# dnf install -y postgresql-server postgresql
Initialise the database:
# postgresql-setup --initdb
 * Initializing database in '/var/lib/pgsql/data'
 * Initialized, logs are in /var/lib/pgsql/initdb_postgresql.log
Start PostgreSQL and enable it to start after reboot:
# systemctl start postgresql
# systemctl enable postgresql
Check that it is running by listing processes listening to port 5432:
# lsof -i tcp:5432
COMMAND    PID     USER   FD   TYPE DEVICE SIZE/OFF NODE NAME
postmaste 6629 postgres    4u  IPv6  65975      0t0  TCP localhost:postgres (LISTEN)
postmaste 6629 postgres    5u  IPv4  65976      0t0  TCP localhost:postgres (LISTEN)
Set the password for the database administrator user postgres:
# su - postgres
$ psql
psql (10.6)
Type "help" for help.

postgres=# \password postgres
Enter new password: 
Enter it again: 
postgres=# \q
$ exit
logout
Configure PostgreSQL to listen for connections from the outside world by editing '/var/lib/pgsql/data/postgresql.conf' with your favourite text editor and set listen_addresses:
listen_addresses = '*'
Enable MD5-encrypted password authentication from localhost by editing '/var/lib/pgsql/data/pg_hba.conf' as follows:
# IPv4 local connections:
host all          all          127.0.0.1/32         md5
Now you should be able to connect to the database from any user on the server:
# psql -h localhost -U postgres
Password for user postgres: 
psql (10.6)
Type "help" for help.
Note that if you are unable to connect with 'psql -h localhost -U postgres', but 'psql -h 127.0.0.1 -U postgres' works okay, check that your '/etc/hosts' is correctly resolving 'localhost' to the local loopback address '127.0.0.1'  .

Install NextCloud

Downloads

Download these files from here to a convenient place (such as '/tmp'):
# cd /tmp
# wget https://download.nextcloud.com/server/releases/nextcloud-16.0.3.tar.bz2
# wget https://download.nextcloud.com/server/releases/nextcloud-16.0.3.tar.bz2.sha256
Verify the checksums to ensure integrity:
# sha256sum nextcloud-16.0.3.tar.bz2
a13f68ce47a1362318629ba5b118a59fa98358bb18f4afc371ea15104f2881f3  nextcloud-16.0.3.tar.bz2
# cat nextcloud-16.0.3.tar.bz2.sha256
a13f68ce47a1362318629ba5b118a59fa98358bb18f4afc371ea15104f2881f3  nextcloud-16.0.3.tar.bz2
They are the same, so proceed to untar the application to the Apache directory:
# tar -xvjf nextcloud-16.0.3.tar.bz2 -C /var/www/html/
Manually create a data folder for use by the installation wizard later on:
# mkdir /var/www/html/nextcloud/data
Change the ownership of the '/var/www/html/nextcloud' directory to allow the Apache server access:
# chown -R apache:apache /var/www/html/nextcloud

SELinux

By default RHEL 8 implements SELinux security policies. Check the status as follows:
# getenforce
Enforcing
If 'Enforcing' either turn off SELinux by editing '/etc/selinux/config' to set SELINUX=disabled and reboot (not recommended), or configure SELinux appropriately as per this (recommended):
# semanage fcontext -a -t httpd_sys_rw_content_t '/var/www/html/nextcloud/data(/.*)?'
# semanage fcontext -a -t httpd_sys_rw_content_t '/var/www/html/nextcloud/config(/.*)?'
# semanage fcontext -a -t httpd_sys_rw_content_t '/var/www/html/nextcloud/apps(/.*)?'
# semanage fcontext -a -t httpd_sys_rw_content_t '/var/www/html/nextcloud/.htaccess'
# semanage fcontext -a -t httpd_sys_rw_content_t '/var/www/html/nextcloud/.user.ini'
# semanage fcontext -a -t httpd_sys_rw_content_t '/var/www/html/nextcloud/3rdparty/aws/aws-sdk-php/src/data/logs(/.*)?'

# restorecon -Rv '/var/www/html/nextcloud/'

# setsebool -P httpd_can_network_connect 1
# setsebool -P httpd_execmem 1
# systemctl reload php-fpm

Create database

Create an empty database for use by Nextcloud:
# su - postgres
psql
CREATE USER nextcloud WITH PASSWORD 'YOUR_PASSWORD';
CREATE DATABASE nextcloud TEMPLATE template1 ENCODING 'UNICODE';
ALTER DATABASE nextcloud OWNER TO nextcloud;
GRANT ALL PRIVILEGES ON DATABASE nextcloud TO nextcloud;
\q
exit

Fire up Nextcloud

Restart the Apache instance:
# systemctl restart httpd

Browse to 'http://your-server-ip/nextcloud' and, all being well, you should see:
Create an admin account and enter the PostgreSQL details:
Then click Finish setup.

Monday, 15 April 2019

GitHub Pages and Jekyll themes

By default, a newly generated Jekyll site uses a theme called Minima. It is a simple, spartan theme with very little to recommend it, so I decided to replace it with one of the supported themes instead.

GitHub Pages Supported Themes
According to the documentation, it should be easy enough: just edit _config.yml and replace minima with the name of the new theme, jekyll-theme-tactile for example.

Actually it was not so easy because the other themes have a more simplistic layout scheme than the Minima theme, so when you serve up the site, you end up with error messages about missing layouts.

The end result is a blank screen and lots of beating your head on the keyboard.

Jekyll layouts

The default Jekyll theme minima has four built-in layouts that are used by different pages of the blog.

When you switch to one of the other GitHub Pages themes, the new theme might only have the default.html layout, so when you switch from Minima to Tactile or Cayman, for example, you will get a blank page because the other layouts are missing.

If you examine the source code of the Minima theme, you will see that there are four layout files in the _layouts folder:

  • default.html: the default base layout
  • home.html: layout for the home page
  • page.html: layout for other pages such as About, Contacts etc
  • post.html: layout for the blog posts

The first step to sorting the problem out is to copy the missing layout files from the minima theme into your own _layouts folder. Don't copy the file default.html for now, just the missing files:

├── _layouts
│   ├── home.html
│   ├── page.html
│   └── post.html

Now you can change the theme without triggering error messages and the site will be visible.

Note that the website will fall back to use the default.html layout that is baked into in the gem of the new theme that you selected, so it may or may not have the functionality you require.

The next step is to use the default.html layout file from the theme that you have chosen as the basis for improving the functionality.

I am using jekyll-theme-tactile, so copy default.html from the Tactile repo to your _layouts folder.

├── _layouts
│   ├── default.html (from the repo of the theme you selected)
│   ├── home.html    (from minima)
│   ├── page.html    (from minima)
│   └── post.html    (from minima)

Commit your changes and push to GitHub:

$ git add --all
$ git commit -m "Add missing layouts"
$ git push

You will not see any changes when you reload the website, but now you have the raw material to build a more usable site.

Favicon

The first thing I did was to add a favicon to the site.

Create favicon.png from an image using GIMP or an on-line tool like faviconit, then copy the image to the root folder of your site and add this line to the <head> section of default.html:
<link rel="shortcut icon" type="image/png" href="favicon.png">
Protip: if you don't see the favicon after you have pushed to github.io, clear your cache and refresh the page. Most browsers should respond to Ctrl+F5 to do the same thing.

Clickable title

Make the title a hyperlink to the site to make it easier to navigate back to Home by adding this line to the <header> section of the <body> of default.html:
<h1><a class="site-title" rel="author" 
      href="{{ "/" | relative_url }}">{{ site.title | escape }}</a></h1>


Further reading

Shout out to this blog post which was extremely helpful when I first hit problems with Jekyll theming.

This book Creating Blogs with Jekyll is a good guide to static website generators.


Sunday, 14 April 2019

GitHub Pages, Jekyll and Centos 7

I have been digging into GitHub Pages as an alternative blog platform in case Blogger follows Google+ to the Great Big BitBucket in the Sky. WordPress is an obvious alternative to Blogger but GitHub Pages offers a simpler escape route.

This post describes how to create and maintain a personal web site on GitHub Pages, and to migrate Blogger content to the new site.

GitHub Pages

GitHub Pages is a static website hosting service for personal, organizational, or project-specific pages that are driven directly from your GitHub repository.

You can use either HTML or Markdown to create the pages. It is a static site hosting service so it doesn't support server-side code such as PHP, Ruby, or Python.

GitHub Pages can work with any static site generator, but for ease of use it is tightly integrated with the Jekyll static site generator.

You feed it Markdown text and it cranks out a static website, using kramdown to parse the Markdown syntax to generate the HTML pages.

github.io

A website generated by GitHub Pages is hosted at <username>.github.io where <username> is the name of your GitHub account.

GitHub Pages generates the web site from content stored in a repository that you create using the same name.

Follow the instructions here to create your new repository <username>.github.io.

Clone the repository to your development environment so that you can work on it using your favourite editor, then push the changes back up to GitHub. After a moment or two, you will see the fruits of your labours by browsing to https://<username>.github.io.

You could continue to work on this simple local copy to build up a functionally rich website, but you will have to set up a Jekyll development environment to do things like migrate posts from Blogger.

The next section describes how to install Jekyll and use it to generate the website.


Jekyll development environment

Install RVM and Ruby

Jekyll is a Ruby Gem that must be installed on your system, which in my case is a Centos 7 workstation. These instructions should work for other RPM-based distros like RHEL or Fedora.

The pre-requisites are Ruby version 2.4.0 or above, as well as GCC and Make.

Install the development tools group which includes GCC and Make:
$ sudo yum update -y
$ sudo yum install @development-tools
The version of Ruby in the Centos 7 repo does not meet the requirements (it is version 2.0), so build the Ruby Version Manager RVM and use it to install the latest version.

Get the GPG keys and install RVM:
$ sudo gpg2 --keyserver hkp://pool.sks-keyservers.net --recv-keys \
    409B6B1796C275462A1703113804BB82D39DC0E3 \
    7D2BAF1CF37B13E2069D6956105BD0E739499BDB
$ sudo \curl -sSL https://get.rvm.io | bash -s stable
Note that for reasons best known to the RVM developers, they have prefixed the curl command with a backslash to suppress any aliases for curl. It is not a typo.

Add your Linux user to the RVM group so that it can be used as a non-root user:
$ sudo usermod -a -G rvm <devuser>
$ sudo getent group rvm
rvm:x:1001:<devuser>
where <devuser> is your Linux username.

Logout and login again to activate the group membership.

List all known rubies to find the latest version of Ruby:
$ rvm list known | less
Install the latest version (2.6 in this case) and check the version numbers:
$ rvm install ruby-2.6
$ rvm use 2.6 --default

$ ruby -v
ruby 2.6.0p0 (2018-12-25 revision 66547) [x86_64-linux]

$ gem -v
3.0.1
Install Jekyll and the gem bundler:
$ gem install jekyll bundler

Generate a Jekyll website

Now we will use Jekyll to generate the website from scratch, replacing the simple version you created above, as follows:
$ rm -rf <username>.github.io
$ jekyll new <username>.github.io
Fire it up:
$ cd <username>.github.io
$ bundle exec jekyll serve
Browse to http://localhost:4000 to see your new site. 

Edit _config.yml to change the blog title and other site-specific details. The inaugural post is in _posts/yyyy-mm-dd-welcome-to-jekyll.markdown. Edit it as you see fit.

Note that the default site that Jekyll generated is powered by two gems:
gem "jekyll", "~> 3.8.5"
gem "minima", "~> 2.0"
Before you publish the website to github.io, replace these two with the github-pages gem that has been commented out in the Gemfile, to get the full value of GitHub Pages. Edit your Gemfile to delete these two default Jekyll gems and replace them with the gem that contains the GitHub Pages functionality by uncommenting the line gem "github-pages", group: :jekyll_plugins then update the site to install the gems:
$ vi Gemfile
$ bundle update
Stop and restart the site to make sure all is well.

Publish to github.io

To publish this on github.io, you need to push the newly generated contents to the repo that you created above.

Initialize the current working directory as a Git repository:
$ git init
Stage and commit the files:
$ git add --all
$ git commit -m "Initial commit"
Link your newly generated website to the repo <username>.github.io that you created above by adding the URL of the project repo to the origin of the local git repo and push the contents to GitHub:
$ git remote add origin git@github.com:<username>/<username>.github.io.git
$ git push -u origin master --force
The --force option will overwrite the contents of the GitHub repo with the contents of the newly generated website, so be careful.

Migrate Blogger posts

Migrating your Blogger posts is straightforward because Jekyll provides importers to move from other blog platforms.

Follow these instructions to create a backup file of your Blogger posts called blog-MM-DD-YYYY.xml.

Import the posts into Jekyll:
$ ruby -r rubygems -e 'require "jekyll-import";
    JekyllImport::Importers::Blogger.run({
      "source"                => "/path/to/blog-MM-DD-YYYY.xml",
      "no-blogger-info"       => false, 
      "replace-internal-link" => false, 
    })'

This will generate the posts in _posts. Note that “Labels” will be included in the export as “Tags”.

If you uploaded images to your Blogger posts, they will be visible as links to your original blog, so you will have to download them and insert them locally before you decommission the old blog.

Thursday, 27 July 2017

iDempiere and Buckminster: building a web-based OSGi application

iDempiere and Buckminster

iDempiere is an open source, web-based Enterprise Resource Planning (ERP) system that has been built with tools from the Java world, but instead of using a familiar build automation tool like Maven, or a newer tool like Gradle, the iDempiere team used Buckminster to manage the build.

We tackled OSGi in an earlier post, now Buckminster as well? OK, roll up your sleeves...

This post looks at the use of Buckminster in the iDempiere project so that we can get a better understanding of the build process, and why Buckminster was used.

What is Buckminster?

Buckminster is a set of frameworks and tools for automating build, assemble and deploy processes. The project is named after the architect R. Buckminster Fuller who said about problem-solving "when I have finished, if the solution is not beautiful, I know it is wrong."

R. Buckminster Fuller
The problem that Buckminster is trying to solve is how to build and assemble multiple software components from multiple sources in combinations that are specific to a given target platform.

Buckminster uses a Component Query (or CQUERY) to identify the components and their associated component information and create a bill of materials (BOM). It then locates all the components in the BOM using a Resource Map (or RMAP) and materializes the project by copying them into the target platform, resolving the dependencies according to the work context, system setup or operating system.

Components

In the context of iDempiere, a component is a collection of files that make up an OSGi bundle, or plug-in, and in the context of the Eclipse IDE, a component may be an Eclipse project. Components can also exist outside the workspace, and they may be dependent on other components. 

RMAP component location mapping
Buckminster can store component information as a Component Specification (CSPEC) in an XML file inside the component, but it is also able to read meta-data from pre-existing sources such as plugin.xml, feature.xml, POM files, etc, and translate such information on-the-fly into CSPEC, which it does in the case of iDempiere.

Buckminster allows you to retrieve components from existing repositories and component formats, such as CVS, SVN, git, Maven, or p2 repositories. This enables the iDempiere team to integrate existing Adempiere code with bespoke iDempiere plug-ins and other third-party modules, without reconfiguring them.

Note that Buckminster can get the same component from different repositories, depending on the circumstances (different geographic locations, for example, or different software development environments like DEV, TEST, QA, PROD, and so on), making it easy to build your own on-site repositories for iDempiere.

Materializing iDempiere in Eclipse

Materialization Specification (MSPEC)

When you install iDempiere in an Eclipse development environment, you must first materialize the project by using a wizard to populate the workspace from the Buckminster Materialization Specification (MSPEC):

File > Import > Buckminster > Materialize from Buckminster MSPEC, CQUERY, or BOM > 
URL: $IDEMPIERE_HOME/org.adempiere.sdk-feature/adempiere.mspec

where $IDEMPIERE_HOME is the root directory of your iDempiere download.

The iDempiere MSPEC instructs Buckminster to install the materialized components in ${workspace.root}/targetPlatform/, using the Component Query in adempiere.cquery, and gives the MSPEC a human-readable name:
org.adempiere.sdk:eclipse.feature:1.0.0.qualifier

Component Query (CQUERY)

Buckminster then reads the Component Query from the CQUERY file named in the MSPEC, triggering its resolution and provisioning process. The CQUERY tells Buckminster where to find the Resource Map, adempiere.rmap, and also defines a number of advisorNodes which specify how groups of components should be handled.

The CQUERY resolution runs for a few minutes to build the Bill of Materials. The wizard gives you the option of saving the BOM to a file if you are interested in reading 20,097 lines of XML.

Resource map (RMAP)

Finally, Buckminster materializes the BOM by looking in the Resource Map (RMAP) for the location of the components and copying the JARs to the targetPlatform.

Note: materialization takes a very looooooong time, so put the kettle on and read the BuckyBook, the definitive guide to Buckminster (perhaps not: see below).

Update

After this post was written, Low Heng Sin, one of the core architects of iDempiere, explained to me that they used Buckminster because Maven was not capable of building Eclipse plug-ins when the project started.

Since then the Tycho set of plug-ins and extensions has been developed to build OSGi bundles using Maven.  Tycho uses OSGi metadata and OSGi rules to deduce project dependencies dynamically and inject them into the Maven project model at build time.

The development of Buckminster appears to have come to a halt so Tycho may be a better bet for new OSGi projects.

Tuesday, 25 July 2017

iDempiere and OSGi: a modular Java architecture

iDempiere and Modularity

iDempiere is an open source Enterprise Resource Planning (ERP) system that describes itself as "OSGi + ADempiere", but what does that mean in practice? 

This post describes OSGi and the technology stack that was used to build iDempiere so that developers and solution architects can see how the system hangs together.

History of iDempiere

In the beginning, there was Compiere ("to accomplish, complete, fulfill" in Italian), an open source ERP system that was started in 1999. Initially it was very successful but after a long-standing disagreement between the developer community and the management company behind Compiere about its monetization strategy, the project was forked by a number of developers to create ADempiere (a word like 'compiere', but with the additional sense of "to fulfil obligations, or discharge duties", and also "to honor and respect").

ADempiere was also very successful, but its monolithic design had a number of limitations so some of the core architects forked the codebase in 2011 to create a more modular system called iDempiere, based on the OSGi specification.

OSGi and modularity

The OSGi specification defines a dynamic component system for Java. It is a specification that describes how individual bundles of code, also known as plug-ins, can be connected together in a dynamic way by a services layer that offers a publish-find-bind model for plain old Java objects (POJOs).

In standard Java everything in a JAR may be visible to all other JARs, but with OSGi, everything in that JAR is hidden unless it is explicitly exported in a predetermined manner. There is no sharing by default, so a bundle that wants to use another JAR must explicitly import the parts it needs. Conversely, a bundle must explicitly export functionality that is to be used by other bundles.

OSGi layered architecture
OSGi does this by specifying a layered model to manage plug-ins:
  • Bundles: these are the OSGi plug-in components that deliver the application functionality, consisting of POJOs with additional meta-data defined in the MANIFEST.MF file. Bundles hide their internals from other bundles and communicate through well defined services. Bundles are self-contained, reusable units of deployable code, usually in the form of a JAR;
  • Services: this layer connects bundles in a dynamic way by offering a publish-find-bind model for the POJOs registered in the service registry. Without OSGi, the standard Java solution is to use static factory methods and Java Reflection to load classes dynamically, resulting is a variety of passive, non-standard APIs and configuration mechanisms;
  • Life-Cycle: the API that allows you to list, install, start, stop, update, and uninstall bundles on the fly without bringing down the whole system. Bundles can be managed directly from the OSGi console command line interface and they can be managed remotely;
  • Modules: the layer that defines how a bundle's dependencies are managed by importing and exporting code according to the bundle's manifest. Modules are discrete, coarse-grained deployable units;
  • Security: the layer that handles  security by separating bundles from each other and enforcing permissions to allow or deny bundles access to each other;
  • Execution Environment: the underpinning OSGi platform that manages the containers. Like the Eclipse IDE, iDempiere is built on Equinox, which is the reference implementation of the OSGi specification (two other notable implementations of OSGi are Knopflerfish OSGi and Apache Felix).

Modular structure of iDempiere

The team that forked the code partitioned the monolithic Adempiere application into a large number of plug-ins, each with its own classpath and set of dependencies. If you download the iDempiere codebase and open it with Eclipse, you will see that it consists of dozens of projects: one for each OSGi bundle, or plug-in. 

This allows developers to create custom-built plug-ins without touching the upstream codebase. The Equinox OSGi container manages these plug-ins as free-standing, deployable Java objects that interact with the rest of the core iDempiere bundles by means of APIs.

Bundles are managed in a service registry

The advantages are:
  • explicit dependency management: iDempiere plug-ins declare what they need and what functionality they provide, whilst otherwise remaining isolated from each other;
  • versioned dependency: you can have different versions of the same Java class in different bundles if necessary because your plug-in's dependencies are managed by the OSGi container, not the JVM;
  • small footprint: plug-ins are not packaged with all their dependencies, and they follow a lazy activation policy so they are only loaded as and when required;
  • easy release: plug-ins can be developed and released independently of upstream developments;
  • hot redeploy: individual plug-ins can be redeployed on the fly without affecting the others.

Core iDempiere plug-ins

org.adempiere.server

Now that we have looked at OSGi, let's dig deeper into the structure of iDempiere and look at the core plug-ins that make up the application.

When iDempiere starts, a Bash shell script idempiere-server.sh executes the Equinox OSGi launcher org.eclipse.equinox.launcher, passing it the name of the initial executable entry point as a runtime option, namely org.adempiere.server.application. This Java class implements the Equinox OSGi IApplication interface and starts the application.

The manifest of org.adempiere.server directs Equinox to load these bundles as dependencies:
  • org.eclipse.equinox.app: implementation of the Equinox OSGi Application Container service;
  • org.eclipse.jetty.apache-jsp: support for JSP in the embedded Jetty HTTP container;
  • org.adempiere.base: the core functionality of iDempiere.

Equinox OSGi Application Container

The Equinox OSGi framework implementation is probably better known as the foundation of the Eclipse IDE platform, but it is actually a standalone OSGi implementation. It is launched by the org.adempiere.server plug-in when iDempiere is started and is responsible for loading all the other iDempiere plug-ins and managing the relationships and dependencies between them.

Read this tutorial on OSGi modularity with Eclipse by the ever-dependable Lars Vogel, and watch this video by Kirk Knoernschild, the author of "Java Application Architecture: Modularity Patterns with Examples Using OSGi", for a very useful overview of the current state of modularity on the Java platform.

Jetty HTTP Server

iDempiere uses the Jetty OSGi infrastructure to embed an HTTP server inside an OSGi container. This hosts the static content, servlets, OSGi web bundles (the OSGi equivalent of WAR files), and provides support for the Java ServerPages (JSPs) used by the original Adempiere code.

In production, it would be wise to put a reverse proxy in front of Jetty, running web application security software such as mod_security. Jetty can expose JMX services which should be monitored in a production environment. The Jetty configuration files are in $IDEMPIERE_HOME/jettyhome/etc/.


org.adempiere.base

This is the base plug-in that provides all the core functionality needed to build iDempiere plug-ins and includes interfaces such as:
  • IResourceFinder: finds resources in each plugin;
  • IColumnCallout: called whenever a column on a table changes its value;
  • IModelValidator: called whenever a record is saved;
  • IMenuAction: called whenever a window menu is created;
  • IModelFactory: called to create new class models;
  • and many others.

Wait, there's more...

These core plug-ins are at the heart of iDempiere, but there are many others that provide the application functionality, including the persistence layer, the report writer and the user interface, so follow the tutorial by Carlos Ruiz from GlobalQSS and download the code to explore further.

Here is a follow-up post that describes how Buckminster is used to build iDempiere on OSGi.

Tuesday, 3 May 2016

PostgREST on RHEL 7.2

PostgREST is an HTTP server written in Haskell that serves a fully RESTful API from a PostgreSQL database. It generates the endpoints directly from the database schema so you do not have to write anything from scratch. You just download the binary, fire it up with a database connection string and you are good to go.


You won't find it as a .deb or .rpm package at the time of writing, so you have to install it manually and create your own startup scripts.

In this post I will describe how to do this on a Redhat Enterprise Linux (RHEL 7.2) server in a managed SELinux context. The PostgreSQL database instance runs on the same server in this example.

Note that RHEL 7.2 ships with PostgreSQL 9.2 which is not supported by PostgREST so you have to upgrade to version 9.3 or later from the PostgreSQL repositories.

Download, install and test the binary 

Download the tarball from the github repo. Select the Centos binary for compatibility with RHEL, then untar it and move it to a directory on the load path:
# tar -xvf postgrest-0.3.1.1-centos.tar.xz
# mv postgrest /usr/bin/postgrest
Test the installation of the binary by invoking the --help dialogue:
# postgrest --help
Usage: postgrest DB_URL (-a|--anonymous ROLE) [-s|--schema NAME]
    [-p|--port PORT] [-j|--jwt-secret SECRET] [-o|--pool COUNT]
    [-m|--max-rows COUNT]
  PostgREST 0.3.1.1 / create a REST API to an existing Postgres database
Now that you have confirmed that PostgREST is accessible, create a test database called 'demo1' by following the Getting Started instructions here, or use an existing database, and run PostgREST:
# postgrest postgres://postgres:my_pass@localhost:5432/demo1 -a postgres -p 5438
   WARNING, running in insecure mode, JWT secret is the default value
   Listening on port 5438
where:
  • postgres:my_pass is the authenticator role (with password 'my_pass') that handles the initial HTTP requests. For the purposes of this example, it is the default PostgreSQL role; 
  • demo1 is the name of the test database that will be exposed by the API; 
  • -a postgres is the name of the role that will handle unauthenticated anonymous requests; and
  • -p 5438 is the port number that PostgREST will use to listen to HTTP requests. Note that by default PostgREST uses port 3000, but this port is managed by SELinux for other purposes, so use 5438 instead because it is unmanaged, and it is close to the default PostgreSQL port number so it is easy to remember. 

Send a simple HTTP GET request to the PostgREST port 5438:
# curl http://localhost:5438
If all is well, PostgREST will return a JSON string with a list of tables and views that are accessible in the database schema:

[{"schema":"public","name":"competition","insertable":true},{"schema":"public","name":"director","insertable":true},{"schema":"public","name":"festival","insertable":true},{"schema":"public","name":"film","insertable":true},{"schema":"public","name":"film_nomination","insertable":true}]

It's that straight forward!

Open the firewall 

The RHEL firewall on the server will block access from the network to the server, so we have to add the PostgREST port 5438 to the public zone and make it permanently available:
# firewall-cmd --zone=public --add-port=5438/tcp --permanent
Reload the firewall and check that the port is open:
# firewall-cmd --reload
# firewall-cmd --zone=public --list-ports
   443/tcp 139/tcp 22/tcp 5432/tcp 5438/tcp 80/tcp 445/tcp 137/tcp
Now you should be able to access the API from a client workstation (where my_server_IP is the hostname or IP address of your PostgREST server):
# curl http://my_server_IP:5438

Create a systemd service

RHEL 7.2 uses systemd to manage the initialisation of services (yes, haters gonna hate), so create a system user to run the service and define a custom systemd service to automate the startup of PostgREST.

Create a system user postgrest with no login shell to run the PostgREST daemon:
# useradd -r -s /usr/bin/nologin postgrest
and create a service description /usr/lib/systemd/system/postgrest.service with the following contents:
[Unit]
Description=PostgREST Service
After=postgresql-9.5.service

[Service]
User=postgrest
Group=postgrest
ExecStart=/usr/bin/postgrest postgres://postgres:my_pass@localhost:5432/demo1 -a postgres -p 5438

[Install]
WantedBy=multi-user.target
Note that the entry 'After=postgresql-9.5.service' will cause the service to start after the initialisation of the database instance has been completed.

Enable the service and start it:
# systemctl enable postgrest
# systemctl start postgrest
It should now start automatically when the server starts up.

Creative Commons License
PostgREST API diagram by Taung Technologies is licensed under a Creative Commons Attribution-NonCommercial-ShareAlike 4.0 International License.

Saturday, 4 July 2015

Tomcat 8 on Debian Jessie with PSI Probe and OpenNMS to monitor performance (Part 3)

We looked at Tomcat 8 in Part 1 of this series and at PSI Probe as a replacement for the default Tomcat Manager application in Part 2.

Now PSI Probe is great for managing Tomcat and its applications, but it does not actively generate alerts if Tomcat is in difficulty, or any other part of the application stack for that matter, so this is where OpenNMS plugs the gap.

Network Management with OpenNMS

If you cut your teeth on the mainframes of the recent past, you will be familiar with network management tools like HP OpenView and IBM Tivoli. These tools are famous for their complexity and cost, so alternatives like Nagios (subsequently forked as Icinga) and OpenNMS emerged as open source alternatives.

OpenNMS is a Java-based, agentless monitoring tool that uses SNMP to monitor devices on the network. It was designed to manage service level agreements, so in addition to fault reporting (with trouble ticketing), it has a large number of service monitors to report against service thresholds.

If your device is SNMP-enabled, OpenNMS will auto-discover the device, add it as another node to your network topology and start monitoring it immediately, including vending machines.


OpenNMS Installation

The instructions for installing on Debian are here, but I will deviate slightly because I want to install OpenNMS on a pre-existing installation of Postgresql 9.4 on another server.

Create a database for OpenNMS

Login to the database server (called 'my-database-ip' here) and create an empty database called 'opennms', owned by 'opennms':
# su - postgres
# psql -c "CREATE USER opennms WITH LOGIN ENCRYPTED PASSWORD 'my-opennms-password';"
# psql -c "CREATE DATABASE opennms WITH OWNER=opennms ENCODING 'UNICODE';"

Install OpenNMS

On the server that you intend to run OpenNMS (called 'my-server-ip' here), add the OpenNMS repository to the APT sources list, add GPG key to verify the integrity of the package, update APT and install OpenNMS:
# vi /etc/apt/sources.list.d/opennms.list
   deb http://debian.opennms.org stable main
# wget -O - http://debian.opennms.org/OPENNMS-GPG-KEY | apt-key add -
# apt-get update
# apt-get install opennms
Once the installation is complete, the database must be initialised, but before you run the scripts, you must give OpenNMS access to the database that you created by configuring the datasources:
# vi /etc/opennms/opennms-datasources.xml
  <jdbc-data-source class-name="org.postgresql.Driver" database-name="opennms" name="opennms" password="my-opennms-password" url="jdbc:postgresql://my-database-ip:5432/opennms" user-name="opennms">
  <jdbc-data-source class-name="org.postgresql.Driver" database-name="template1" name="opennms-admin" password="my-postgres-password" url="jdbc:postgresql://my-database-ip:5432/template1" user-name="postgres">
Now configure the JRE for OpenNMS and then run the installation:
# /usr/share/opennms/bin/runjava -s
# /usr/share/opennms/bin/install -dis
Install the iplike package to optimize lookups based on IP addresses, and then start the service:
# /usr/sbin/install_iplike.sh
# systemctl start opennms
If all is well, you should be able to browse to your instance of OpenNMS at http://my-server-ip:8980 and log in with admin/admin.

You can check that all the daemons are running with:
# opennms -v status
Note that OpenNMS uses two ports that you should be aware of: an httpAdaptor at 8181 and the application itself running on Jetty at 8980.

Once you have completed the install, you may want to comment out the OpenNMS repository that you added to APT, to prevent unsolicited updates of OpenNMS, particularly in a Production environment.

Discover nodes

By default OpenNMS monitors no network nodes at all, so the very first thing to do is to register the nodes to be monitored.

You can do a range scan but that will register every device in the range, whether you want to manage it or not, so rather register the nodes explicitly.

There are a number of ways to do this, but since you already have the IP address, the easiest is to register it directly:

Admin > Configure OpenNMS > Configure Discovery > Specifics > Add new

This will open a pop-up where you enter the IP address of the node, in this case it would be my-server-ip.

Click on 'Add", then when the pop-up closes, click on 'Save and Restart Discovery'.

Wait a moment while the discovery daemon runs, then list the node that you registered:

Info > Nodes

Now that the node has been discovered, I will show you how to monitor the JVM using JMX and SNMP in a later post. In the meantime, play around with the Service Level Management functionality in OpenNMS that comes out of the box.

Wednesday, 1 July 2015

Tomcat 8 on Debian Jessie with PSI Probe and OpenNMS to monitor performance (Part 2)

In Part 1 of this series of three, I looked at the installation of Tomcat 8 on Debian Jessie. The standard Tomcat Manager web application is limited in functionality, and the look-and-feel is distinctly lacking, so here is PSI Probe instead.

PSI Probe features

PSI Probe supplements the basic functionality of Tomcat Manager with a number of very useful features, including:
  • real-time monitoring of request traffic on the Connectors, from any Remote IP, or per application;
  • viewing of Data Source pool usage, and query execution;
  • monitoring of Logs, with the ability to dynamically change log levels at runtime;
  • viewing the Thread execution stack, with the option of killing threads;
  • dashboards to monitor the JVM, showing memory usage, swap file usage and garbage collection control;
  • and detailed System properties data.
PSI Probe is a fork of an older application called Lambda Probe that was last updated in 2006. This is a Lambda Probe:


Installing PSI Probe

You have to build PSI Probe from the source code because it is not available as a Debian package. It is a Java application, so it is a simple matter of cloning the project from GitHub and running Maven:
# git clone https://github.com/psi-probe/psi-probe
Check that you are using Maven 3, and upgrade if necessary, because the build will fail if you use Maven 2. Don't forget to purge maven2 if you have to upgrade.
# mvn -version
Apache Maven 3.0.5
Maven home: /usr/share/maven
Java version: 1.7.0_79, vendor: Oracle Corporation
Java home: /usr/lib/jvm/java-7-openjdk-amd64/jre
Default locale: en_ZA, platform encoding: UTF-8
OS name: "linux", version: "3.16.0-4-amd64", arch: "amd64", family: "unix"
If all is well, change to the PSI Probe directory and build the WAR file:
# cd psi-probe
# mvn package
The build will take some time the first time that you run it, because of all the JARs that must be downloaded from Maven Central to your local repository.

When it is done, use the Tomcat manager to deploy the war. Browse to http://my-server-IP:8080/manager, login with the same manager-gui role that you created in Part 1, scroll down to the section titled "Deploy" and use the option "Select WAR file to upload" to deploy the WAR file which you will find at psi-probe/web/target/probe.war.

Once it is deployed, browse to http://my-server-IP:8080/probe, login with the same manager-gui role, and dig around your Tomcat 8 installation. Much better looking, isn't it?


In Part 3, the last of this series, I will explain how OpenNMS can be used with SNMP to monitor Tomcat 8 and generate exceptions if any thresholds are exceeded.

Tuesday, 30 June 2015

Tomcat 8 on Debian Jessie with PSI Probe and OpenNMS to monitor performance (Part 1)

This is the first of three posts about the latest version of Apache Tomcat, still the most widely used application server, on Debian Jessie, with PSI Probe to manage it and OpenNMS to monitor its up-time.

What's new in Tomcat 8?

Debian Jessie was released with Apache Tomcat 8, which provides the following:
  • Java Servlet 3.1, an incremental release of the servlet specification that includes non-blocking I/O to improve scaleability and an HTTP protocol upgrade mechanism that allows the client and the server to negotiate a transition from HTTP 1.1 to some other new chosen protocol;
  • JavaServer Pages 2.3, a maintenance release to provide support for Expression Language (EL) 3.0 and to use the functionality of the Servlet 3.1 API;
  • Java Unified Expression Language (EL) 3.0, which allows EL to run in a standalone mode outside of servlets or JSPs, plus lambda expressions and other Java 8 goodies;
  • WebSocket 1.1, which allows full duplex communications over TCP so that bidirectional data can flow at the same time;
  • A single, common resources implementation that merges Aliases, VirtualLoader, VirtualDirContext, JAR resources and external repositories into a single framework rather than a separate one for each feature;
  • and Java EE 7 as a minimum pre-requisite, preferably Java EE 8, which has better support for HTML5, WebSockets, JSON and RESTful services.


Tomcat 8 is more flexible and better equipped to support web services than its predecessor, so let's proceed to the upgrade.

Installing Tomcat 8

Installing Tomcat 8 on Debian Jessie is dead simple. First, SSH to your web server (called 'my-server-IP' here) as root, and  execute 'java -version' to check that OpenJDK 7 is installed as a minimum:

# java -version
java version "1.7.0_79"
OpenJDK Runtime Environment (IcedTea 2.5.5) (7u79-2.5.5-1~deb8u1)
OpenJDK 64-Bit Server VM (build 24.79-b02, mixed mode)

If you don't see OpenJDK 7, you will have to install it and set it to be the default JVM:

# apt-get install openjdk-7-jdk openjdk-7-demo openjdk-7-source
# update-alternatives --config java

If you prefer, you can install OpenJDK 8 from the jessie-backports repository instead of OpenJDK 7, but it makes no difference to Tomcat 8.

Now install Tomcat 8:

# apt-get install tomcat8 tomcat8-admin tomcat8-docs tomcat8-examples tomcat8-user 

If all goes well, the service should start automatically and you should be able to browse to http://my-server-IP:8080 to see the default page:

Configuring Tomcat 8

Once you have installed Tomcat 8, you must enable the manager webapp, and you may optionally tune the JVM memory settings.

Edit /etc/tomcat8/tomcat-users.xml to include a manager (called 'my-user' here), with the appropriate roles to use the web console manager:

# vi /etc/tomcat8/tomcat-users.xml
<tomcat-users>
   <role rolename="manager-gui"/>
   <role rolename="admin-gui"/>
   <user username="my-user" password="my-user-password" roles="manager-gui,admin-gui"/>
</tomcat-users>

The manager-gui role has the highest privileges, allowing you to use the web console manager to deploy and undeploy apps, view stats, generate leak detection diagnostics, expire sessions, and so on. The admin-gui role is needed to access the virtual host manager.

Optionally edit the default Tomcat 8 configuration to make sure that JAVA_HOME is correctly set and to tune the performance of the JVM:

# vi /etc/default/tomcat8
JAVA_HOME=/usr/lib/jvm/java-7-openjdk-amd64
JAVA_OPTS="-Djava.awt.headless=true -Xms2048m -Xmx2048m -XX:+UseConcMarkSweepGC"

Now restart Tomcat 8, using the systemd way of managing services:

# systemctl restart tomcat8

and browse to http://my-server-IP:8080/manager.

Login with the username you created in tomcat-users.xml to access the Web Application Manager, an eye-watering horror of mustard and green that we will quickly replace with PSI Probe in Part 2 of this series, a much better-looking web console manager with a raft of extra functionality.


Location of Tomcat 8 directories on Debian

Note that the Debian package maintainers have a standard Debian way of doing things so the Tomcat 8 directories may not be where you expect them to be. The relevant locations are:

/etc/default: the initial default settings such as the Tomcat user ID, JAVA_HOME, JVM settings, and so on, are in the file 'tomcat8'.

/etc/tomcat8: the server configuration files are here, including context.xml, server.xml and tomcat-users.xml.

/etc/logrotate.d: the log settings for catalina.out are in the file 'tomcat8'.

/usr/share/tomcat8: this is $CATALINA_HOME, the root of the Tomcat installation, also known as $TOMCAT_HOME. It has startup, shutdown, and other scripts, as well as the Tomcat JARs in $CATALINA_HOME/lib (the original project to develop the servlet engine was called Catalina).

/var/lib/tomcat8: this is $CATALINA_BASE, also known as $TOMCAT_BASE, which holds instance-specific directories for web applications, with the code in $CATALINA_BASE/webapps.

/var/log/tomcat8: all the log files are stored here.

Now stay tuned for the installation of PSI Probe in Part 2.

Friday, 3 April 2015

How to fix and run the broken EclipseLink Tutorial example (JSF and JPA)

The EclipseLink Tutorial

The EclipseLink implementation of JPA has a tutorial for running it with JSF on the Tomcat servlet container, instead of a full-blown Java EE Application Server.

The tutorial mentions two source code downloads, both of which were missing from the page, but I managed to find a directory of the stubbed tutorial source that you can use as a starting point as you follow the EclipseLink tutorial, as well as the code for the completed version of the application.

Unfortunately, the tutorial is out-of-date, the source code has several errors, and the application itself is very primitive, but you may be curious enough to want to try it out anyway. This is how to get the completed application running on Tomcat against a PostgreSQL database using the Eclipse IDE.

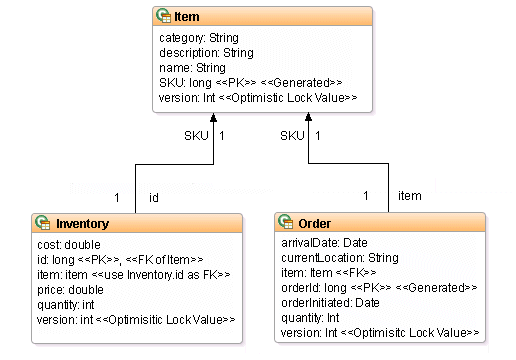
The application is a very simple Order application with this object model:

Tutorial Object Model


Set up the environment

Download and unzip the code for the completed version of the application. It is an Ant project that is not structured like an Eclipse Dynamic Web Project, so just create a simple Java project, called here EclipseLinkTutorial, and import the source code order-jsf-jpa-example-128127 from your download folder.

Tomcat is a servlet container, not a Java EE application server like WildFly (formerly known as JBoss Application Server), so you must manually copy the PostgreSQL database driver as well as the EclipseLink and Java Persistence JARs to EclipseLinkTutorial/lib. I got mine from my Maven repo because I had used them in another project. They are:
  • postgresql-9.3-1102-jdbc41.jar 
  • eclipselink-2.6.0-M3.jar 
  • javax.persistence-2.1.0.jar 
Don't forget to refresh the project so that Eclipse can see the jars. Note that it is not worth the bother to Mavenise the project to add these dependencies. See this StackOverflow discussion about Ant and Maven.

Configure the database

Switch to your database server, fire up psql as postgres and create a login role (a.k.a. the user) and database:

CREATE ROLE eclipselinktutorial LOGIN SUPERUSER CREATEDB;
ALTER ROLE eclipselinktutorial PASSWORD 'eclipse';
CREATE DATABASE eclipselinktutorial WITH ENCODING='UTF8' OWNER=eclipselinktutorial;

Test the connection from Eclipse, where 'your-DB-server' is either the hostname of your database server or 'localhost' if you have installed PostgreSQL on your workstation:

→ Window → Open perspective → Other... → Database development
Right-click Database Connections → New... → Connection
      Profile Types: PostgreSQL
      Name: eclipselinktutorial
→ Next
      Database: eclipselinktutorial
      URL: jdbc:postgresql://your-DB-server:5432/eclipselinktutorial
      User name: eclipselinktutorial
      Password: eclipse

Check the 'Save the password' box then click on Test Connection. It should say "Ping succeeded". Click on Finish.

Configure the JPA persistence properties

Edit the persistence file EclipseLinkExample\persistence-unit\src\META-INF\persistence.xml and set the following properties to match the database configuration (don't forget to change 'your-DB-server'):

<persistence xmlns="http://java.sun.com/xml/ns/persistence"
 xmlns:xsi="http://www.w3.org/2001/XMLSchema-instance"
 xsi:schemaLocation="http://java.sun.com/xml/ns/persistence persistence_1_0.xsd"
 version="1.0">
 <persistence-unit name="default" transaction-type="RESOURCE_LOCAL">
  <provider>org.eclipse.persistence.jpa.PersistenceProvider</provider>
  <class>oracle.toplink.jpa.example.inventory.model.Inventory</class>
  <class>oracle.toplink.jpa.example.inventory.model.Order</class>
  <class>oracle.toplink.jpa.example.inventory.model.Item</class>
  <properties>
   <property name="javax.persistence.jdbc.logging.level" value="FINE" />
   <property name="javax.persistence.jdbc.driver" value="org.postgresql.Driver" />
   <property name="javax.persistence.jdbc.url"
    value="jdbc:postgresql://your-DB-server:5432/eclipselinktutorial" />
   <property name="javax.persistence.jdbc.password" value="eclipse" />
   <property name="javax.persistence.jdbc.user" value="eclipselinktutorial" />
  </properties>
 </persistence-unit>
</persistence>

Fix the project

The downloaded source code directory from the Oracle site has errors that cause the Ant build.xml script to fail.

It is missing directories that the Ant build.xml script expects, so create the following folders:
  • persistence-unit/classes 
  • persistence-unit/deploy 
  • extras/classes 
  • web-application/classes 
  • web-application/deploy 
The entities in EclipseLinkTutorial/persistence-unit/src have a property called version which has an annotation of @Version. In the entity Item, the setVersion() method is annotated, not the field itself, which will cause this error:
      Mapping metadata cannot be applied to properties/methods
      that take arguments.

Annote the field version in the entity Item with @Version and remove the getter and setter to fix this.

The entity Item also has the annotations @Id and @GeneratedValue on the method getSKU(), not the field SKU itself. Move them to the correct place:
       @Id
       @GeneratedValue
       protected long SKU;

There are two named queries in Order that will generate build errors because 'SKU' is incorrectly written 'sKU'. Edit Order and make sure they both read 'SKU".

In the build.xml file, include this line to each of the three javac directives to suppress warnings when the Ant build runs:
      includeantruntime="false"

Lastly, edit the DDLGenerator class in extras/src to replace "toplink.ddl-generation" with "eclipselink.ddl-generation" so that when the generate-tables target is executed, the correct property is set to instruct the Entity Manager to recreate the tables.

Generate the database tables

Now you are ready to run the Ant builds:

Right-click EclipseLinkTutorial/build.xml → Run As → Ant Build...
      Deselect the default target to be executed and select generate-tables
→ Run

If it runs very quietly with no errors, you have succeeded. Yay.


Now create the data by executing the Ant target populate-data.

Generate the WAR

The last step is to compile and package the WAR for deployment to Tomcat:

Right-click EclipseLinkTutorial/build.xml → Run As → Ant Build...
      Select the default target all and check that the other targets are deselected
→ Run

It will create EclipseLinkTutorial/web-application/deploy/jpa-example.war which you can deploy to your instance of Tomcat.

Of course, getting the complete application up and running is one thing. Understanding JPA is another, so download the stubbed code, roll up your sleeves and work through the tutorial.

Thursday, 12 March 2015

Upgrade to Debian Jessie before the Official release date


I have been running Gnome Classic on Debian Wheezy for the last couple of years, but Debian Jessie will be released soon and it includes some interesting new packages:
  • Docker for Linux containers
  • Steam for gaming (in non-free) 
  • ownCloud for private cloud storage 
  • systemd as default, which caused a lot of angst in the Debian community
Unlike other distros, the Debian release policy is to release when it is good and ready. Jessie was frozen in November last year and the package maintainers are down to the last 55 Release Critical bugs, so Jessie is likely to be formally released in April this year.

None of my systems are mission-critical so I decided to do an in-place upgrade from Wheezy to Jessie now, before it is officially released.


It's all very straightforward if you follow the Debian instructions.

First, back up the data you care about to an external drive in the unlikely event that it all goes pear-shaped. You do backup regularly don't you? Good for you. I don't. Nobody does. Well, except for you and other more disciplined network administrators.

Second, make sure that your existing implementation of Wheezy is up-to-date and consistent.

# apt-get update
# apt-get upgrade

List any packages which have a status of Half-Installed or Failed-Config, or show an error status.

# dpkg --audit

List any packages which have been put on hold.

# dpkg --get-selections | grep 'hold$'

Fix them, then when you are done, list all your packages and check that they all show 'ii' in the first column.

# dpkg -l | more

Rinse and repeat. When you are done, remove any forgotten packages.

# apt-get autoremove

Now you are ready to update and upgrade. Replace Wheezy with the Jessie repositories by editing the software sources in /etc/apt/sources.list and changing "wheezy" or "stable" to "jessie".

# vi /etc/apt/sources.list
deb http://yourmirror.debian.org/debian/ jessie main
deb http://security.debian.org/ jessie/updates main
deb http://yourmirror.debian.org/debian/ jessie-updates main
deb http://yourmirror.debian.org/debian/ jessie-backports main

Update the list of available packages for the new release.

# apt-get update

The upgrade is a two-part process: first a minimal upgrade of those packages which can be upgraded without requiring other packages to be removed or installed, then the Full Monty, a complete upgrade of the system, installing the newest versions of all packages and resolving dependency changes between packages.

# apt-get upgrade
# apt-get dist-upgrade

You may get prompted to respond to questions from the install scripts. Most often the default answer is correct, but always choose the option to display the proposed changes before deciding.

Once it has run its course, you can remove the old Wheezy packages.

# apt-get autoremove

You can see a list of the new features in the new release here.

Friday, 5 December 2014

Lightweight web-based transactional systems

Reanimating a legacy system

I have a set of data from an old legacy application that must be resurrected and web-enabled. The data was extracted from a relational database so it is structured in a conventional third-normal form, but the original application was pensioned off a long time ago, and probably a good thing too.

The user interface and its business logic must be rebuilt as a web-based transactional application so that the data can be accessible from a variety of devices, so I had to decide on a technology stack, but how? There are dozens of database systems, hundreds of software languages, scores of web-development frameworks, and more opinions about the matter than there are trolls on 9GAG.


The formal approach to making a decision would be to consider all the various technologies at each layer of the application stack and then weigh up the pros and cons of each.

A less formal approach would be to ask someone who has done this sort of thing before, like a grizzled Unix veteran or an 31337 h4x0r. 

In the end I applied a divide and conquer algorithm to eliminate dozens of decision points in a few strokes.

MVC or not?

The first thing to decide is the core structure of the application. The application must be web-based, and most dynamic web-sites are based on a Model-View-Controller architecture, but is this pattern still relevant today? Is it applicable to my use case?

I have a data set that must be viewed and maintained because of its historical value, so the application must have a Model. It is not a utility program that has no persistent data. 

It must be a web-based system, accessible from various user interfaces like a browser or smartphone app, so it must have a View. This is not a command-line application. 

Lastly, the data set will be the subject of various views, some of which will be used to maintain and update the data, so the system must have a Controller to manipulate the Model.

So the MVC pattern is most the logical structure for a web-based transactional application.

There are alternatives, like Facebook's Flux, but they are usually just refinements of the MVC pattern, although JoĆ«lle Coutaz introduces a hierarchy of MVC-style layers in her Presentation–Abstraction–Control pattern which is useful for applications that need complex client tiers.

One thing to bear in mind is that web applications use HTTP which is a stateless protocol, so the system must have a Controller that is able to maintain state.

Open or closed source software?

Your average punter may not care whether they have access to the source code of the software or not, but if you are a software developer, you certainly should care. A mechanic would not buy a car with an engine that was locked up, so why would an I.T. professional use proprietary software? I want to see inside, dammit. I might not know what I am looking at, but I want to poke around anyway (and yeah, I know that Blogger is not open source but I will leave that fight to Richard Stallman).

So goodbye to products from Microsoft, Oracle, Adobe, and IBM, amongst others.

Okay, this binary chop between open and closed software means that in terms of the operating system, I am down to Linux, a BSD variant, OpenSolaris, or something less well known like Minix, Darwin, Plan 9 and the rest.


Let's be sensible and stick to Linux. I am currently using Debian Wheezy but we can argue about the distro later. 

Relational or NoSQL?

The next binary chop involves the data layer. My raw dataset is already in a highly normalised relational format, so it makes no sense to convert it to one of the NoSQL databases. Just import it into a relational database. But which one? 

The major open source relational databases are MySQL, MariaDB (which was forked from MySQL), and PostgreSQL. I don't trust Oracle with the custodianship of open source software, so that eliminates MySQL, and I don't see compelling technical arguments for MariaDB over PostgreSQL, so PostgreSQL it is. 

Static or dynamic type-checking? Functional or procedural? Compiled or interpreted?

I need a programming language to manipulate the model. The application needs a state engine, mechanisms to provide transactional integrity and role-based access control, so a server-side template engine is not going to cut it. I have to carve code, but what sort of code?

Entering into a discussion about the merits and demerits of a programming language is like competing in a bog snorkelling championship. There are no winners, just a bunch of cold, wet, exhausted people, covered in mud and weeds.

We can nail down some basic requirements though, like readability. Nobody wants to maintain code that looks like it was written by someone with bits of toast stuck in the keyboard, so that excludes Turing tar-pits like Brainfuck or functional languages like Lisp.


Variable typing is another. I like a variable to be clear about its role in a piece of code, and so do compilers. A language with static types will have fewer surprises at runtime and a compiler can get cracking with its optimisations straightaway, so I decided to go for Java because I am creating a web site, not writing a device driver, and C++ makes me feel seasick.

Java might not be as elegant as Haskell and it has its detractors, but it has a just-in-time compiler, garbage collection, a raft of libraries for reuse, and Java 8 introduces lambda expressions which reduces bulky anonymous inner classes to single expressions. Not too shabby then.

Bare bones or the full Monty? 

Okay, so now I need a Java application server that runs on Linux. The choices are Jetty, Geronimo, TomEE, GlassFish, Enhydra, Resin, JOnAS, JBoss EAP (now Redhat) or WildFly.

But do I really need a full blown application server? I want a bare-bones solution, simple, but not too simple, so I decided to stick with Apache Tomcat because it is one of the most widely used application servers and, although it is just a servlet container, it can be beefed up by adding other components of the Java EE stack as required. Well, within reason, unless you want to recreate TomEE on your own.

As a bonus the Tomcat API documentation is full of terms like Valve, Filter, Container, Pipeline and Engine which is what you want to hear in a software workshop.

Web frameworks for the JVM

Unfortunately I could not find a cleavage plane to divide up the hardest decision: which Java web development framework to use.

Community-driven or standards-driven? Component-based or request-based? Rich responsive user interface or server-side rendering? Cutting-edge or tried-and-tested? 

Matt Raible has done excellent work sketching out the landscape, as have the guys at ZeroTurnaround, so based on their spade work, I see that if this was a Reality TV contest called Survivor JVM 2014, SpringMVC would be leading the pack, with JavaServer Faces hard on its heels. Also in the race are Grails, Vaadin, Google Web Toolkit, Play, and Struts.


There are no right or wrong decisions at this point, they will all do the job, but I have to choose one.

SpringMVC is a request-based MVC framework so it provides a lot of control of the client-side HTML, CSS and JavaScript, but it does not follow the Java EE standard. It did give J2EE a good kick in the pants though, which was ultimately a good thing for web development in general.

Grails makes good reuse of Spring and Hibernate but I really don't want to wrap my head around Groovy, even though it is a superset of Java and runs on the JVM.

Play looks interesting, and I can see the attraction of convention over configuration, but if I am not using Scala, what are the advantages of abandoning the servlet specification?

Struts paved the way for other Java frameworks and is still widely used as a consequence, but it has long since been overtaken by the others.

Vaadin uses GWT widgets and they both produce very rich user interfaces. Vaadin is particularly impressive and is from Finland, like gravlax and the reindeer it is named after, but, like gravlax, it is too rich to eat every day.

So that leaves JavaServer Faces.

Like all the other frameworks, JSF has its detractors, including James Gosling himself, but it provides a Controller with a well documented request-response life-cycle that can manage state, and it has had a new lease on life thanks to component libraries like PrimeFaces.

Changing landscape

Having settled on JSF, it is worth noting that the View layer of Java web applications is currently in a state of flux.

The Java EE 8 spec includes an action-based MVC, but server-side web application frameworks are coming under pressure from HTML5 and client-side JavaScript MVC frameworks like AngularJS and Backbone that communicate with the server using JSON over REST or WebSocket. In fact, there is a project called AngularFaces that tries to combine AngularJS with JSF. 

The key is to make sure that the web application has a very clean separation of concerns so that if the decision to use JSF gets overtaken by events it can be stripped out without leaving too much damage to the remaining parts of the stack.

So the technology stack looks like this: a View consisting of HTML, CSS and JavaScript running in a browser, a Controller consisting of JavaServer Faces in a Tomcat servlet container, and a Model provided by PostgreSQL. The server will run on Linux.